Choosing Colors

Last Updated: June 19, 2019

Color wheel, with yellow, orange, green, blue, and red hues displayed in a circular pattern.

When it comes to painting or choosing furnishings for your home, you might make your choice based upon whether it matches your current décor. There are a few things to consider if you’re looking to blend into your existing color scheme or if you want an item to stand out without wrecking the visual experience you are looking for.

A helpful tool is the color wheel. It can be useful in selecting a piece of art that matches your room’s colors, or it can help you determine what colors to paint your walls once you’ve selected a furniture upholstery pattern you like.

The first color wheel was devised by Sir Isaac Newton in the 17 th Century. A simple color wheel includes the three primary colors (red, yellow, and blue), the secondary colors (green, violet, and orange), and tertiary colors (yellow-green, blue-green, blue-violet, red violet, red-orange, and yellow-orange).

In selecting colors, one possibility is to use complementary colors . Begin by choosing a color (in this case, yellow) then draw a straight line across the color wheel (it will cross purple on the wheel). These colors are basically opposites and are considered complementary.
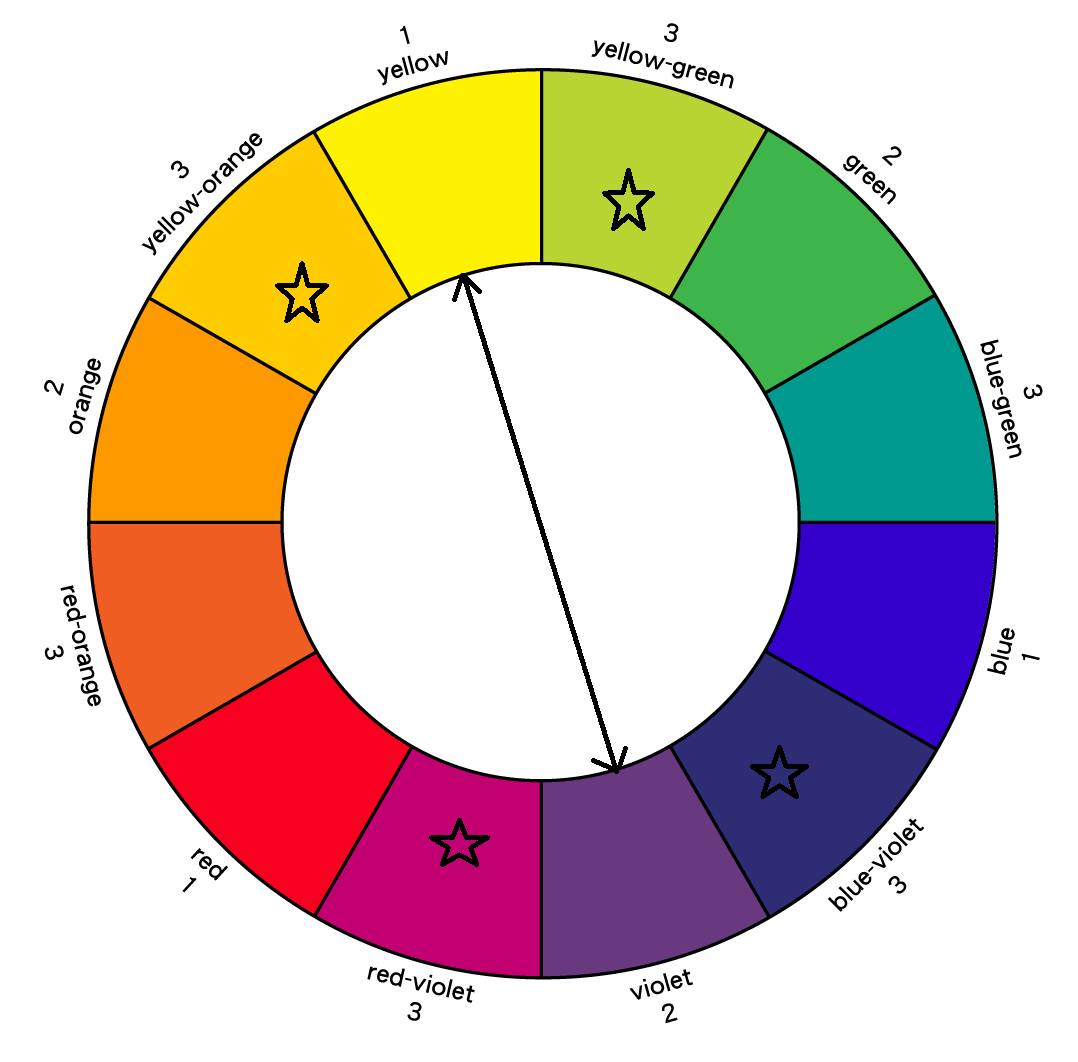
Color wheel with yellow-green, red-violet, and blue-violet, opposite yellow-orange, green, and red.

If the difference in the two colors is more dramatic than you would like, but you still want contrast, you can try using a color directly to the right of the left of the complementary color. These colors would be the split complementary colors .

Another approach would be to use analogous colors . To find analogous colors on the wheel, simply choose a color and move two colors to the right or left of your chosen color. In the example below, I chose green with blue as the analogous color. Alternatively, yellow is also analogous to green.
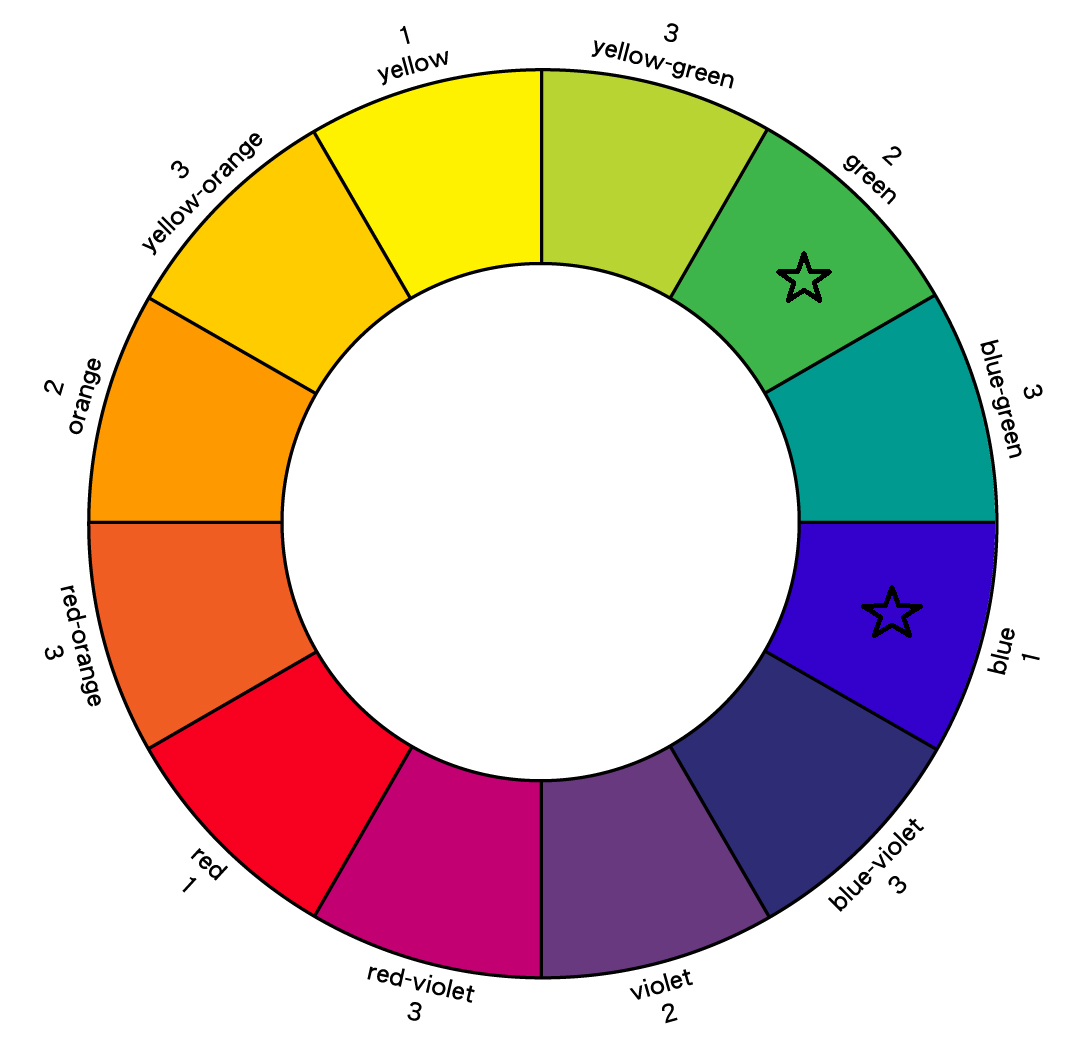
Color wheel showing primary, secondary, and tertiary colors. Green and blue-green are marked with stars.

Another method is to use the triad of colors . Choose a color on the color wheel and draw an equilateral triangle. In the example below, I chose yellow and the triad is completed with red and blue.
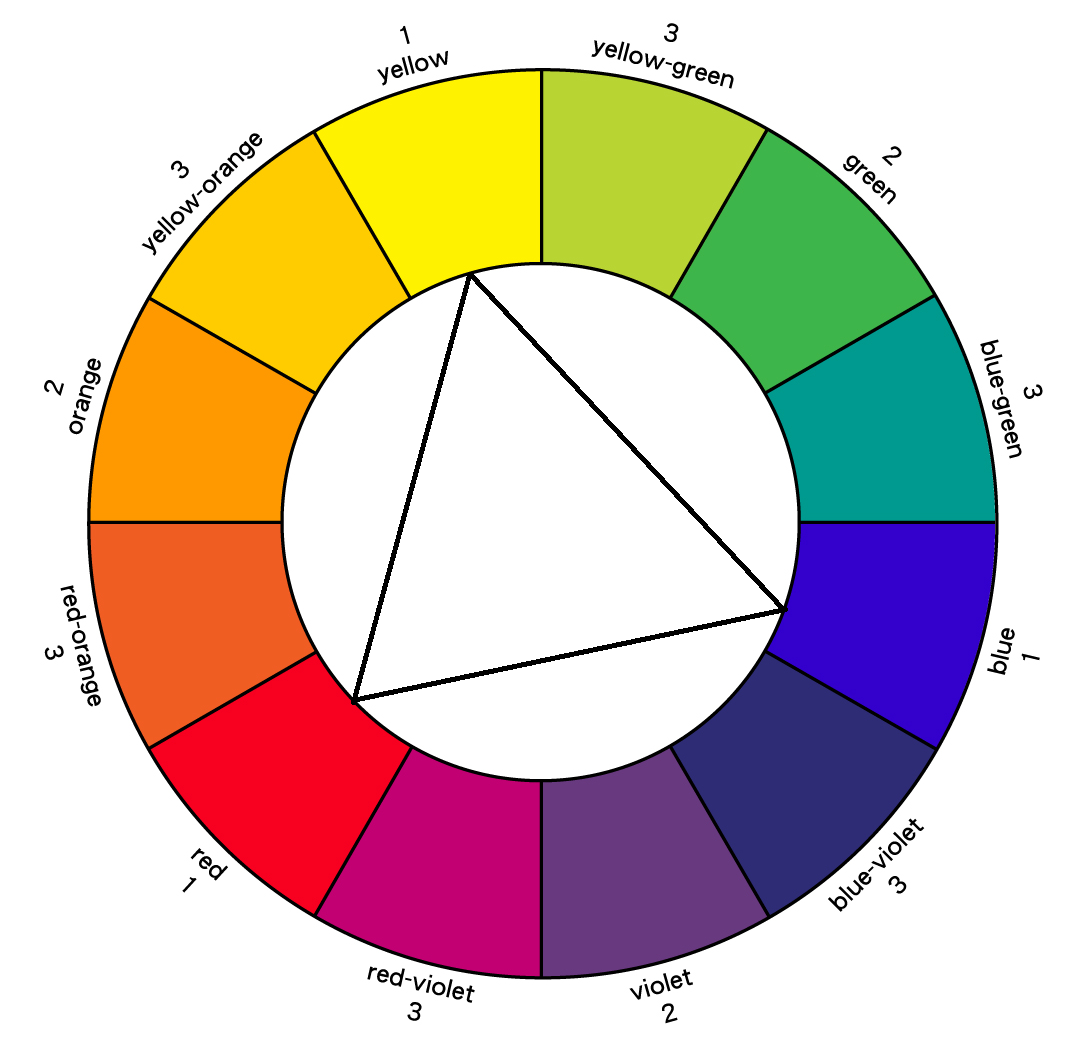
Color wheel with primary, secondary, and tertiary colors. Triad drawn to red, blue, and yellow.

You don’t need to use all the colors chosen by these methods, but understanding their relationships can enhance your room. When choosing colors, be sure to pick from colors that achieve the atmosphere you want in the room. Blues and greens may create a more relaxing aesthetic for you, yellows and reds might be used for a room that you’d like to appear more energetic. For more ideas on color, check out our blogpost on light and color.
Person looking up, reaching towards a bright blue sky with fluffy white clouds, framed by a white wall.
By beachpainting February 12, 2026
Each year, most paint manufacturers release a “Color of the Year” along with a palette of complementary shades. Pantone — the global authority on color — is best known for the Pantone Matching System (PMS), which provides a standardized language for identifying, matching, and communicating color across design, fashion, printing, and manufacturing. Their annual selection is often a strong predictor of broader color trends and frequently aligns with the palettes chosen by major paint manufacturers.
Workers in lift painting the exterior of a white house with a blue sky background.
By beachpainting January 6, 2026
Winter is here on the Outer Banks, and if your home is part of a rental program, you’re likely working through a long checklist to prepare for the upcoming season.
Overhead view of a hurricane swirling over a deep blue ocean, white clouds form a spiral.
By beachpainting August 25, 2025
Hurricane season on the Outer Banks occurs between June and November, with the peak of the season occurring from Mid-August to Mid-October. If you own property on the Outer Banks, you’re already acutely aware of this. With Hurricane Erin currently wreaking havoc along the East Coast, now is a good opportunity to provide some quick tips for your home during hurricane season.
Light green three-story house with white trim, balconies, and turret under a blue sky.
By beachpainting July 9, 2025
When it comes to home improvement, few things make an instant visual impact like a fresh coat of paint. Whether it's reviving weather-worn siding or refreshing an outdated interior, painting can breathe new life into your space. But as you start collecting quotes, you may wonder: why does a good painting contractor cost more than others?
Gray house with white trim, red door, and a circular driveway.
By beachpainting June 24, 2025
The Transformative Power of Washing and Painting Your Home
Two-story house with weathered blue shingles, several windows. Ladder leans against the side.
By beachpainting June 10, 2025
If you’ve been putting off painting your house, you’re not alone—but it may cost you more than you think. Summer is the best time of year to paint your Outer Banks home. If you've noticed signs of paint failure (e.g. fading, peeling, blistering, chalking), give us a call today.
Hand with dusty fingers next to light-colored, horizontal wall siding.
By beachpainting May 27, 2025
If you've noticed a fine, powdery residue on your painted walls or outdoor surfaces, you may be dealing with chalking paint. This is a fairly common issue that occurs when paint breaks down over time due to weather exposure, UV rays, or low-quality paint ingredients. It’s especially prevalent on exterior surfaces (especially fiber cement siding). What Causes Chalking? Chalking happens when the paint binder deteriorates, allowing pigment particles to loosen and form a chalky dust. While it’s a natural part of aging for some paints, excessive chalking can affect appearance, stain surrounding surfaces, and prevent new paint from adhering properly. How to Fix Chalking Paint Test for Chalking: Rub your hand or a dark cloth over the surface. If it comes away dusty, you have chalking. Clean the Surface: Use a stiff brush or pressure washer to remove as much chalk as possible. Follow up with a mild detergent and rinse thoroughly. Let It Dry: Ensure the surface is completely dry before proceeding. Prime If Necessary: For areas with stubborn residue or if you're repainting, apply a high-quality, binding primer suited for chalky surfaces. Repaint: Choose a premium, weather-resistant paint and apply as recommended. Preventing Future Chalking Invest in high-quality paint with strong UV resistance and proper binders. Regular maintenance, such as gentle washing and inspections, also helps keep surfaces looking fresh. By addressing chalking early and using the right materials, you can extend the life and look of your paint job for years to come!
Person on a ladder painting a house's exterior siding near an oval vent.
By beachpainting May 8, 2025
Summer is a great time to paint your Outer Banks home if it is not in rental program. Temperatures and humidity are relatively consistent and longer daylight hours generally lead to shorter project durations.
Hand touching rotted wood siding with damaged building wrap, revealing underlying rot, outdoors.
By beachpainting October 29, 2024
Wood rot in homes and buildings on the OBX is a common occurrence. It is caused when bacteria and fungi have a chance to grow in a damp environment. Our weather (high humidity, nor’easters, hurricanes, etc…) provides enough moisture to promote wood rot. If you know what to look for, you can often catch the rot early enough to avoid major structural damage.
Paint roller and tray with a paint can in the background; preparing to paint.
By beachpainting June 25, 2024
In a previous blog post, we tackled the topic of how to determine whether your house needs to be repainted. If your paint job is holding up well, but you have minor paint damage to your walls from children, pets, or summer guests, the following guide will help you. Step-by-Step Guide to Wall Touch-Ups: Clean the Surface: Begin by cleaning the damaged areas with a mild detergent and water. Remove any dust, dirt, or greased that may affect paint adhesion. Prepare the Surface: Use a fine-grit sandpaper (around 220-grit) to smooth rough edges around the damaged area. Wipe clean with a tack cloth to remove any sanding dust. Prime (if necessary): For significant repairs or bare patches, apply a primer to ensure proper adhesion and uniformity of the topcoat. Apply Paint: Use a small brush (angled brushes work well for corners and edges) or a roller for larger areas. Apply the paint in thin layers, feathering the edges to blend with the surround wall. Allow each coat to dry completely before applying the next coat. Blend and Feather: To achieve a seamless finish, father the edges of the touch-up paint into the existing paint. This technique helps to minimize visible lines and ensure a uniform finish. Expert Tip: Matching Paint SheenSatin and eggshell finishes will lose their sheen over time, which means your wall touch-up may be visible to the naked eye (even if the color match is perfect). One method to assure uniformity in sheen is to add a few drops of water into your paint bucket (assuming you are using a water-based paint). If you are touching up an oil-based paint, add a little paint thinner.